
This page is available to download in Microsoft Word format.
![]() By using Breakout rooms we can:
By using Breakout rooms we can:
- Introduce elements of co-creation, collaboration and team building.
Learning outcomes
By the end of this guide you should know;
- how to set up and pre-prepare Breakout rooms using Channels.
Watch a video of this guide.
Download a transcript of this video.
1. Having created a Team or Teams using the Blackboard Groups method, open MS Teams and log in.

2. Select the desired Team that has been created.

3. Click the three dots (More options) followed by Add channel.

4. Type a name for the Breakout room in Channel name and change Privacy to Private.
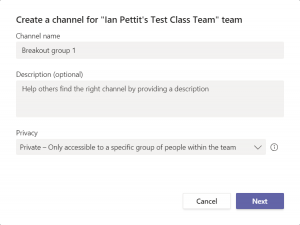
5. Click Next and add the respective students to the Channel using the Add button. Once the sub-set of students are added click Done.

![]() Repeat steps three to five to create multiple Channels – one per breakout room required.
Repeat steps three to five to create multiple Channels – one per breakout room required.
6. The required number of Private Channels will now appear in the left hand side.

7. To pre-populate content and add tools such as a Class Notebook, click into one of the new Private Channels and use the ‘+’ icon to add a desired tool.

![]() Ahead of the synchronous session, populate all channels with the relevant content/exercises/collaborative spaces as required. As students enter the Team at the beginning of the synchronous session they will see only the Breakout room/Channel they have been allocated to and can use this as and when you require them to.
Ahead of the synchronous session, populate all channels with the relevant content/exercises/collaborative spaces as required. As students enter the Team at the beginning of the synchronous session they will see only the Breakout room/Channel they have been allocated to and can use this as and when you require them to.