
How to turn your camera into a visualiser

Back in the day, an over-head projector would be used to display a hand-drawn image onto a large screen, or more often the classroom wall, so everyone could see it. Then the visualiser came along that would convert an image and display it on a class smartboard. By digitising the image, you could save, reuse and annotate to your heart’s content. Fast forward to the past year and people were suddenly working from home without the use of their classroom aids, such as the useful classroom visualiser. Working remotely from home led to new challenges and new solutions. First Blackboard Collaborate and then MS Teams enabled sessions to go online and PowerPoint has become the standby for presenting content. But if your students are learning methods and processes where you need to be able to work through examples – as in maths or science – then a method that lets you write or draw live is essential.
You can purchase visualisers or graphics tablets to overcome this issue, but these come with a price. If you do not have the budget to spend, or time to learn how to use a graphics tablet, then you can try using the camera on your mobile phone or tablet. If you use the phone over WIFI, or with a USB connection, you do not even need a SIM card in the phone, so an old or spare smartphone will do the job.
Visualiser apps for your phone
An alternative way of using your phone as a visualiser is to use a visualiser app, such as IPEVO Visualiser. For this method you will need to add a piece of software to your phone and another to your computer. Ensure that you can set your phone to a suitable height and display a clear picture. IDocCam is the software app for phone, available via your Android or Apples store. The other software required is IPEVO, a chrome app, that you use in the browser and as it does not need to be installed on your computer or laptop it does not need admin access to use. Full instructions are available on how to Turn smartphones into doc cams with IPEVO iDocCam | On IPEVO (medium.com). Be aware that although these apps were freely available last year, there may now be a small charge that could change in the future.
When you are using the app as a visualiser ensure to set the focus to AFS so the camera does not try to refocus on your hand all the time. Have a practice before you do a live session to confirm that any documents you share are clearly displayed.
Using a camera in MS Teams
If you want to share a document in MS Teams you can now use a built-in camera or a USB-connected camera.
Step 1
If you are not using a built-in camera (webcam) then connect your camera to your PC using a USB cable (other methods such as Bluetooth do not currently work). Using a desk clamp stand for your camera will ensure you get a clear picture with no camera shake. One with a gooseneck will be the most versatile, but otherwise propping your camera up with whatever you have to hand, an old stool or a pile of books, will work.
Step 2
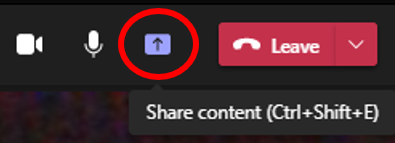
In your MS Teams meeting, select Share Content.
Step 3
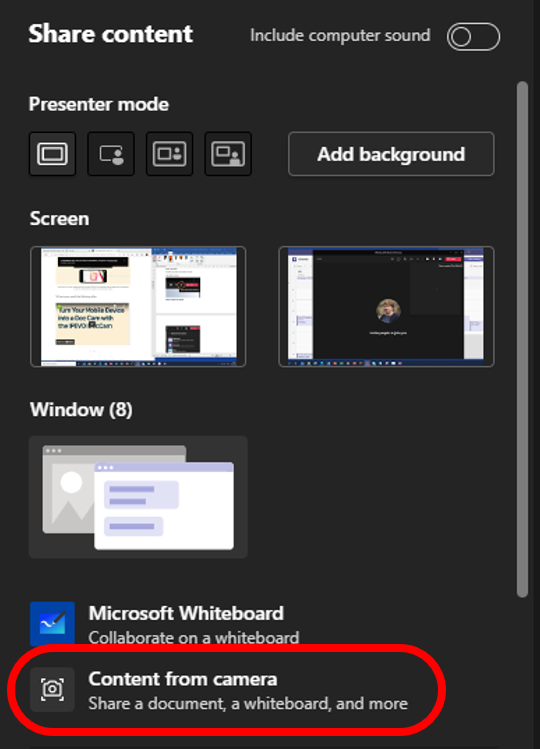
Select Content from Camera.
Step 4
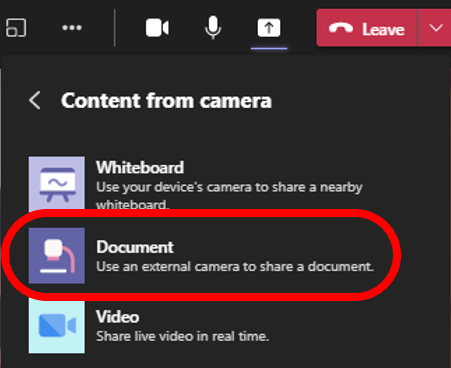
Select Document.
Step 5
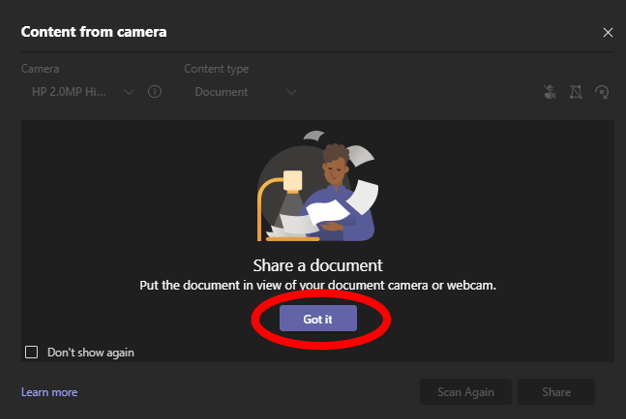
Place your document in front of the camera and select Got it.
Step 6
Select Share to share the document with your audience or if the image is not clear, adjust and select Scan Again.
Further information is available at Share whiteboards and documents using your camera in Teams meetings (microsoft.com)
Banner image by Geralt from Pixabay. Screenshots used with permission from Microsoft.